Personalization Points
Introduction
Personalization points deliver personalized content by bringing together a data space, profile data graph, personalization type, and response template into a single configuration. Now that you’ve set up these components in the previous workshops, you’re ready to create a personalization point and begin defining decisions and targeting rules that control how personalized content is delivered to a website.
Before starting the hands-on exercises in this workshop, watch the video below to learn more about personalization points and decisions or experiments that you can configure within them.
Enter the password LearnSPtoday to play the video.
Build and Test a Manual Content Personalization Point
- Search and select
Personalizationfrom App Launcher. - Click on the Personalization Points tab.
- Click New.
- Click the Manual Setup tile, then click Next.
- Complete the Personalization Point Properties fields with the following values:
- Data Space: default
- Profile Data Graph: Real-Time > Profile
- Personalization Point Name:
Homepage Banner - Personalization Point API Name:
Homepage_Banner - Personalization Type: Manual Content
- Response Template: Banner with CTA
- Data Space: default
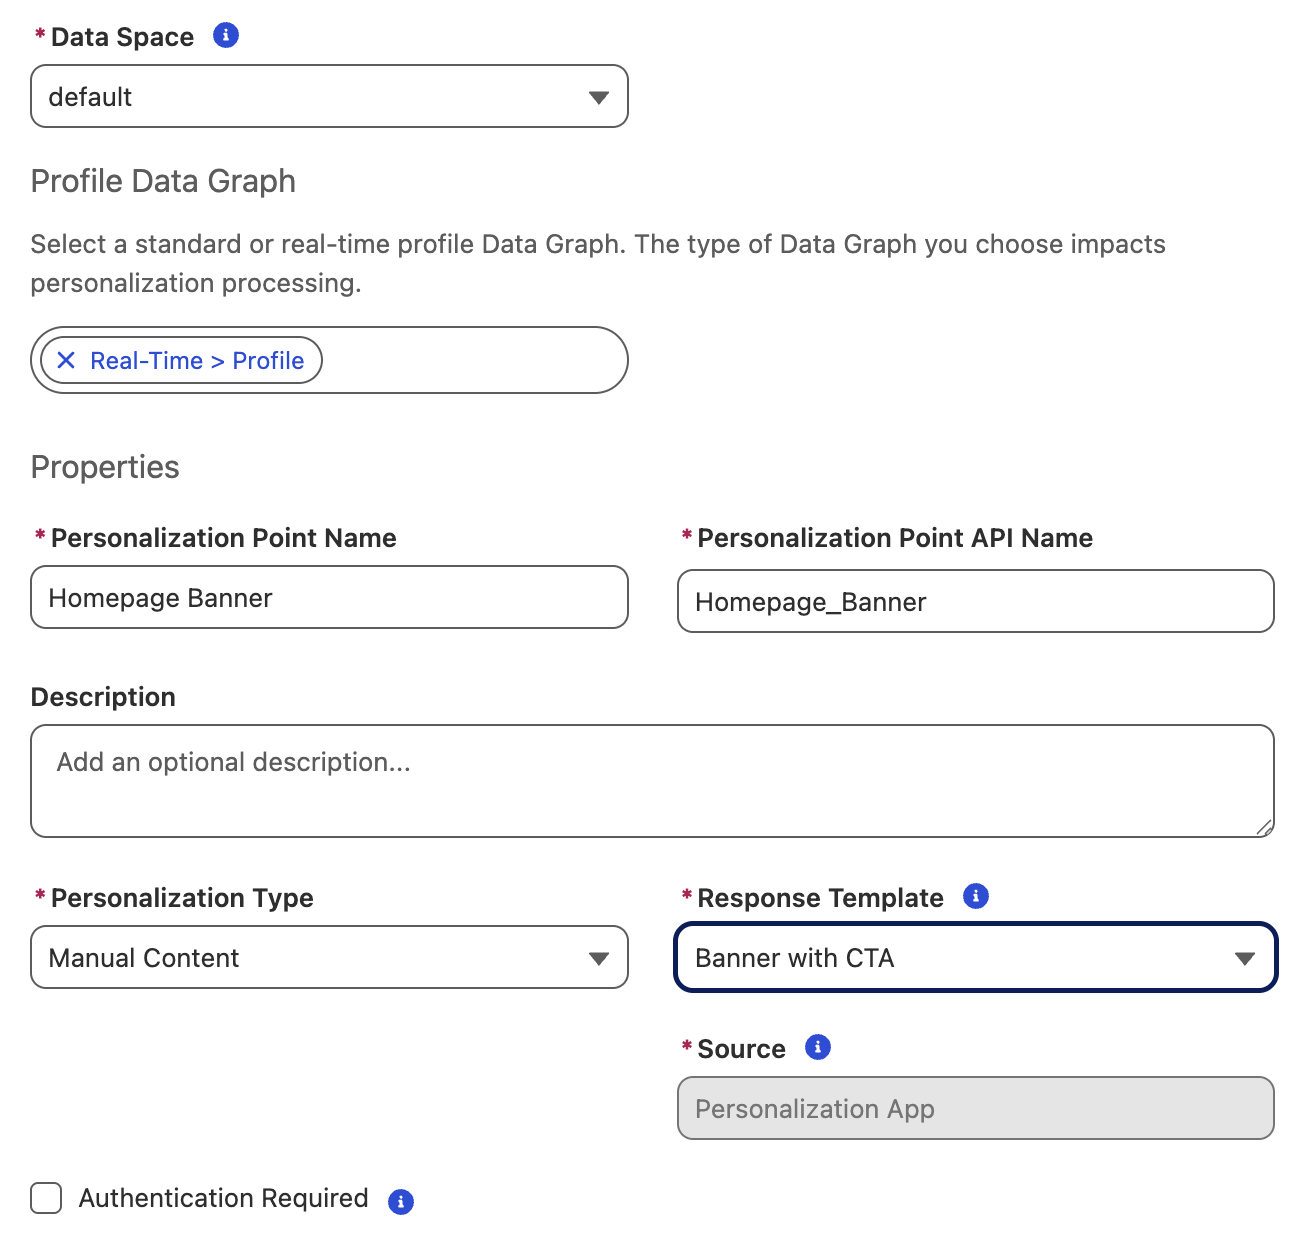
- Click Save.
- From the list view, open the Homepage Banner personalization point that you just created.
Create Personalization Decisions
On the Related tab, you’ll see two types of configurations available for the personalization point: an experiment and personalization decisions. In this exercise, you’ll create three personalization decisions.
- Click New on the Personalization Decisions section.
- Enter the following Decision Properties values:
- Decision Name:
Mountain Bikes - Decision API Name:
Mountain_Bikes - Decision State: Live
- Decision Name:
- Click Next.
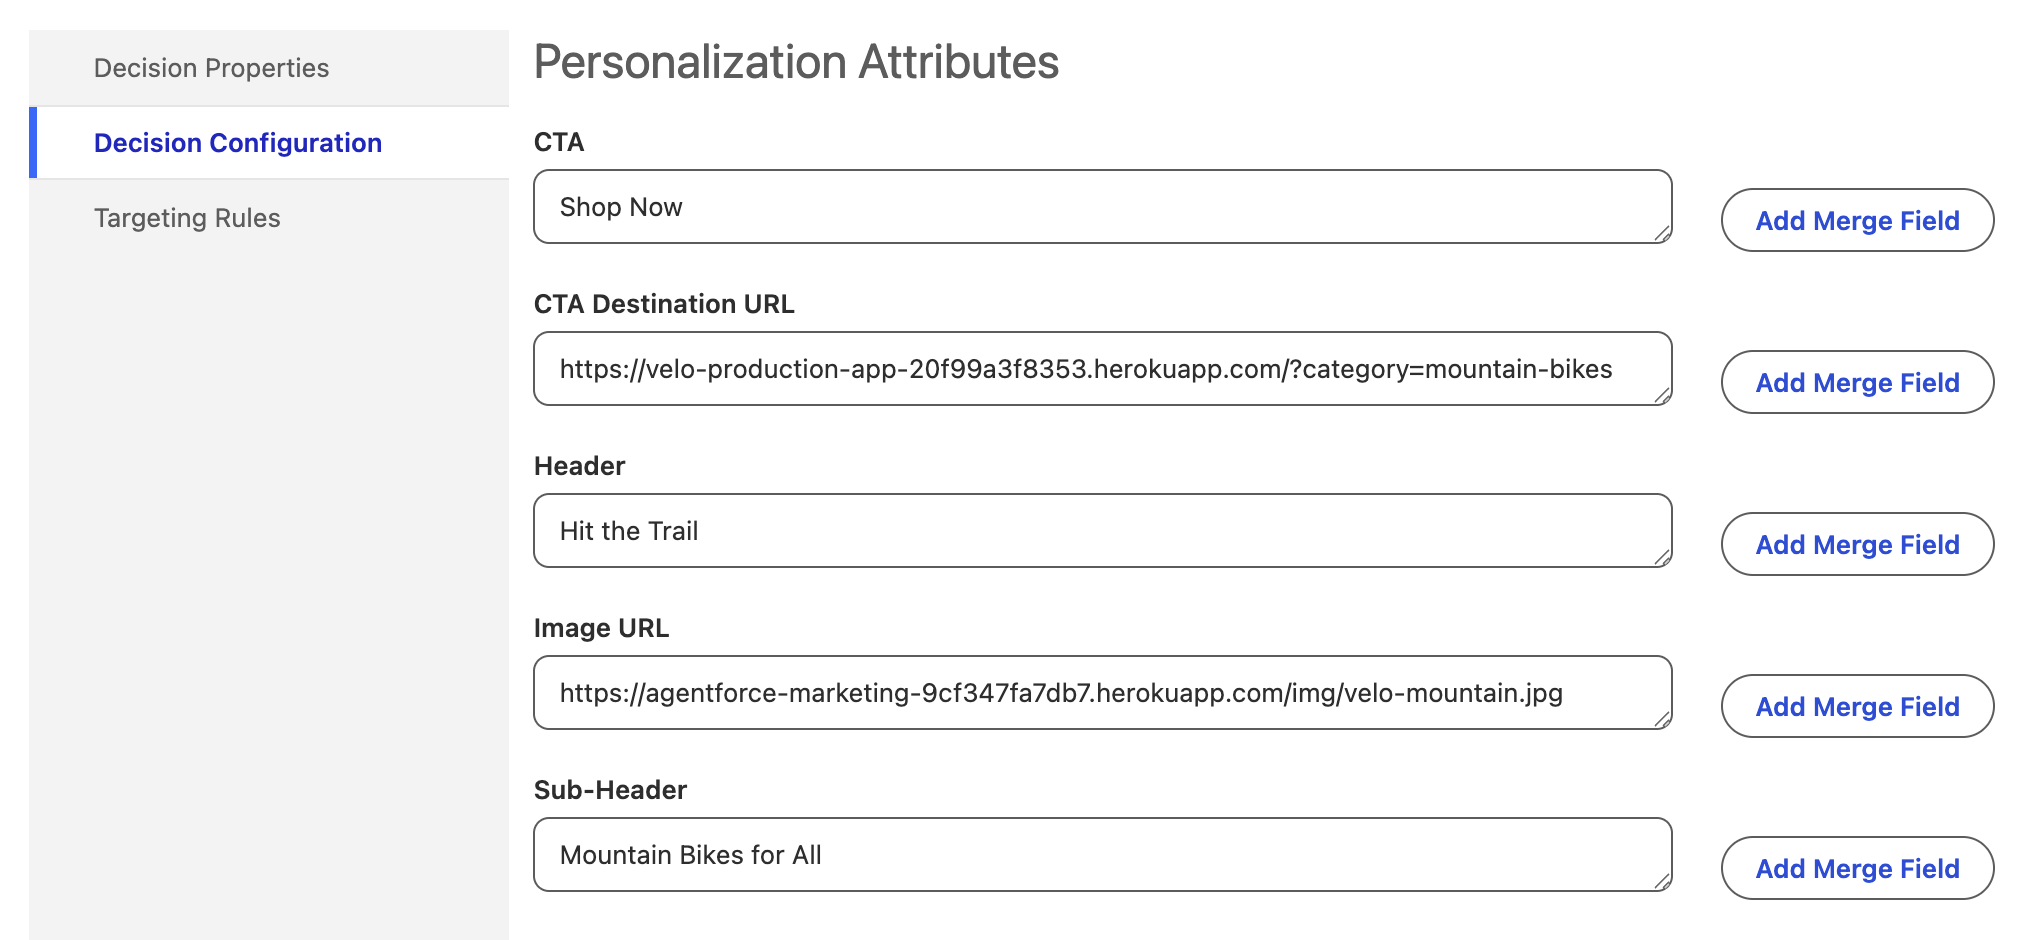
- Enter the following Decision Configuration values:
- CTA:
Shop Now - CTA Destination URL:
https://velo-production-app-20f99a3f8353.herokuapp.com/?category=mountain-bikes - Header:
Hit the Trail - Image URL:
https://agentforce-marketing-9cf347fa7db7.herokuapp.com/img/velo-mountain.jpg - Sub-Header:
Mountain Bikes for All
- CTA:
- Click Next.
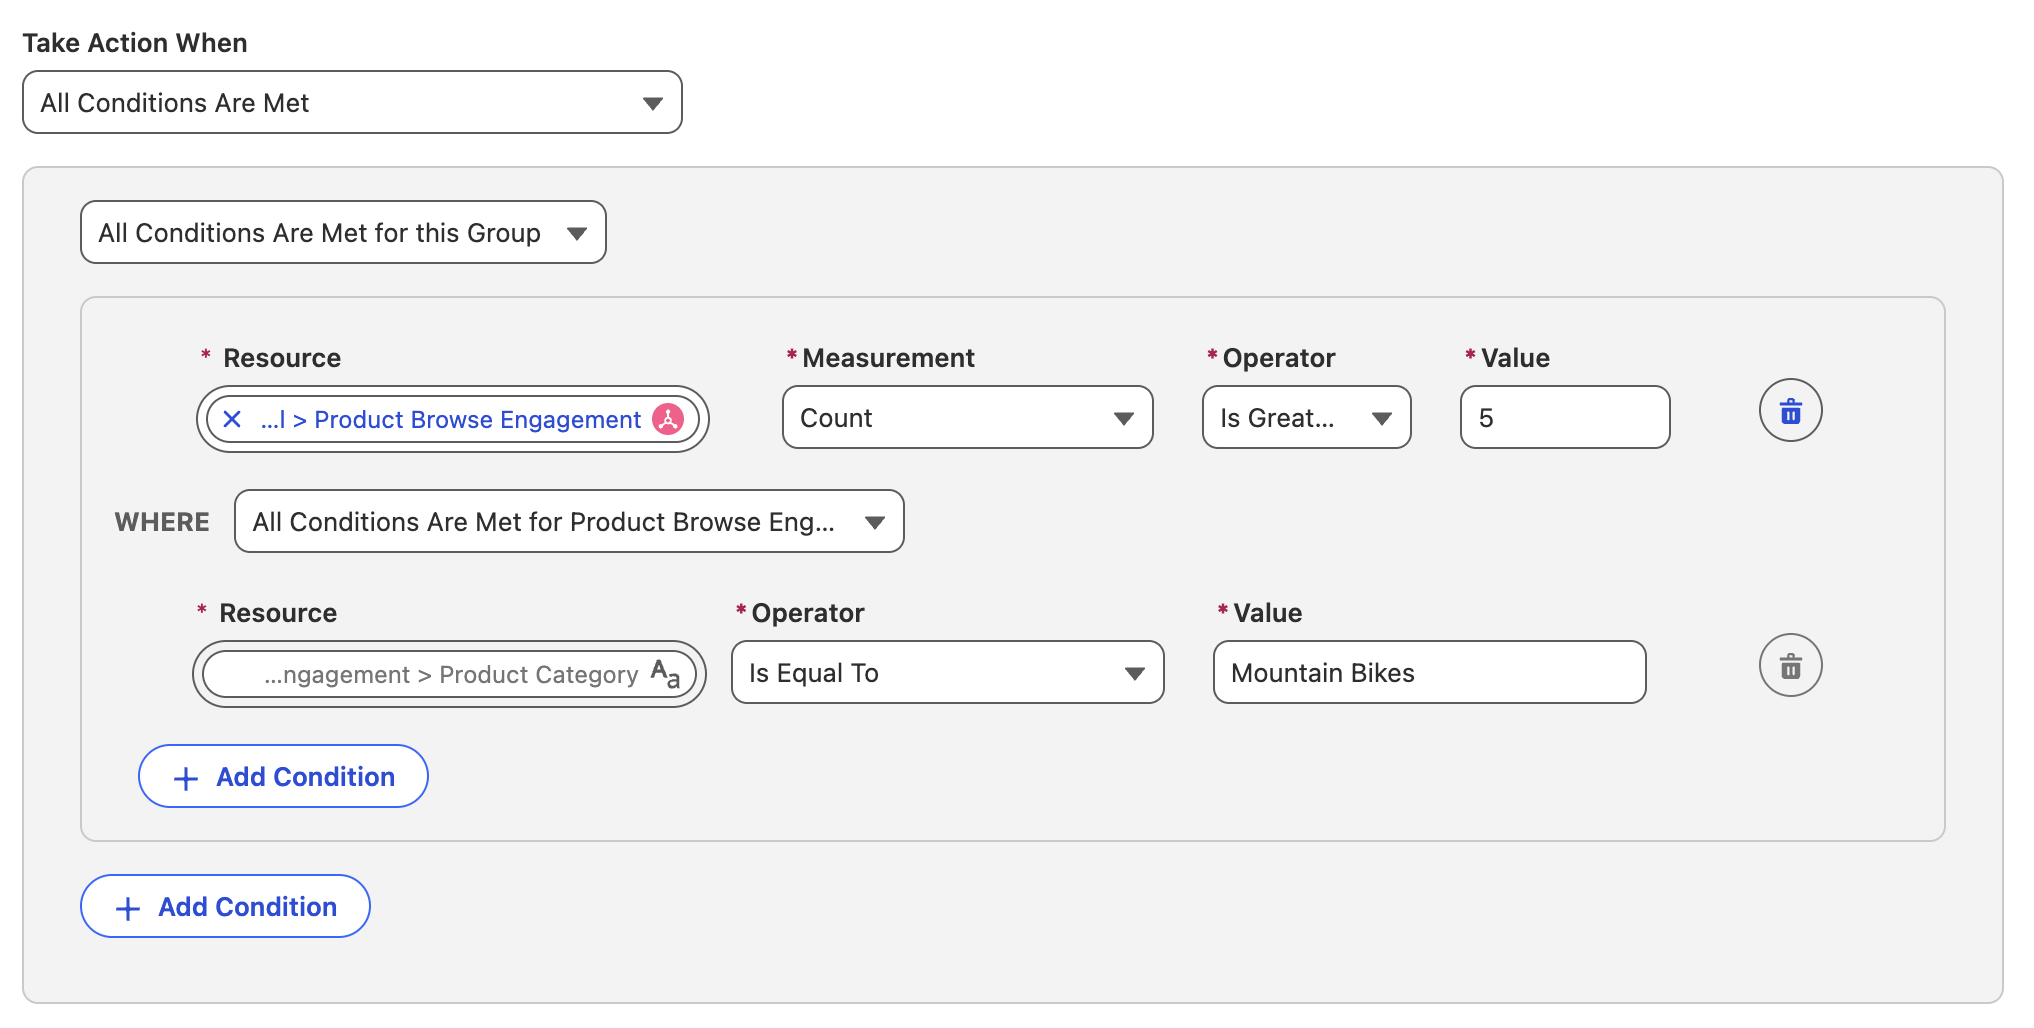
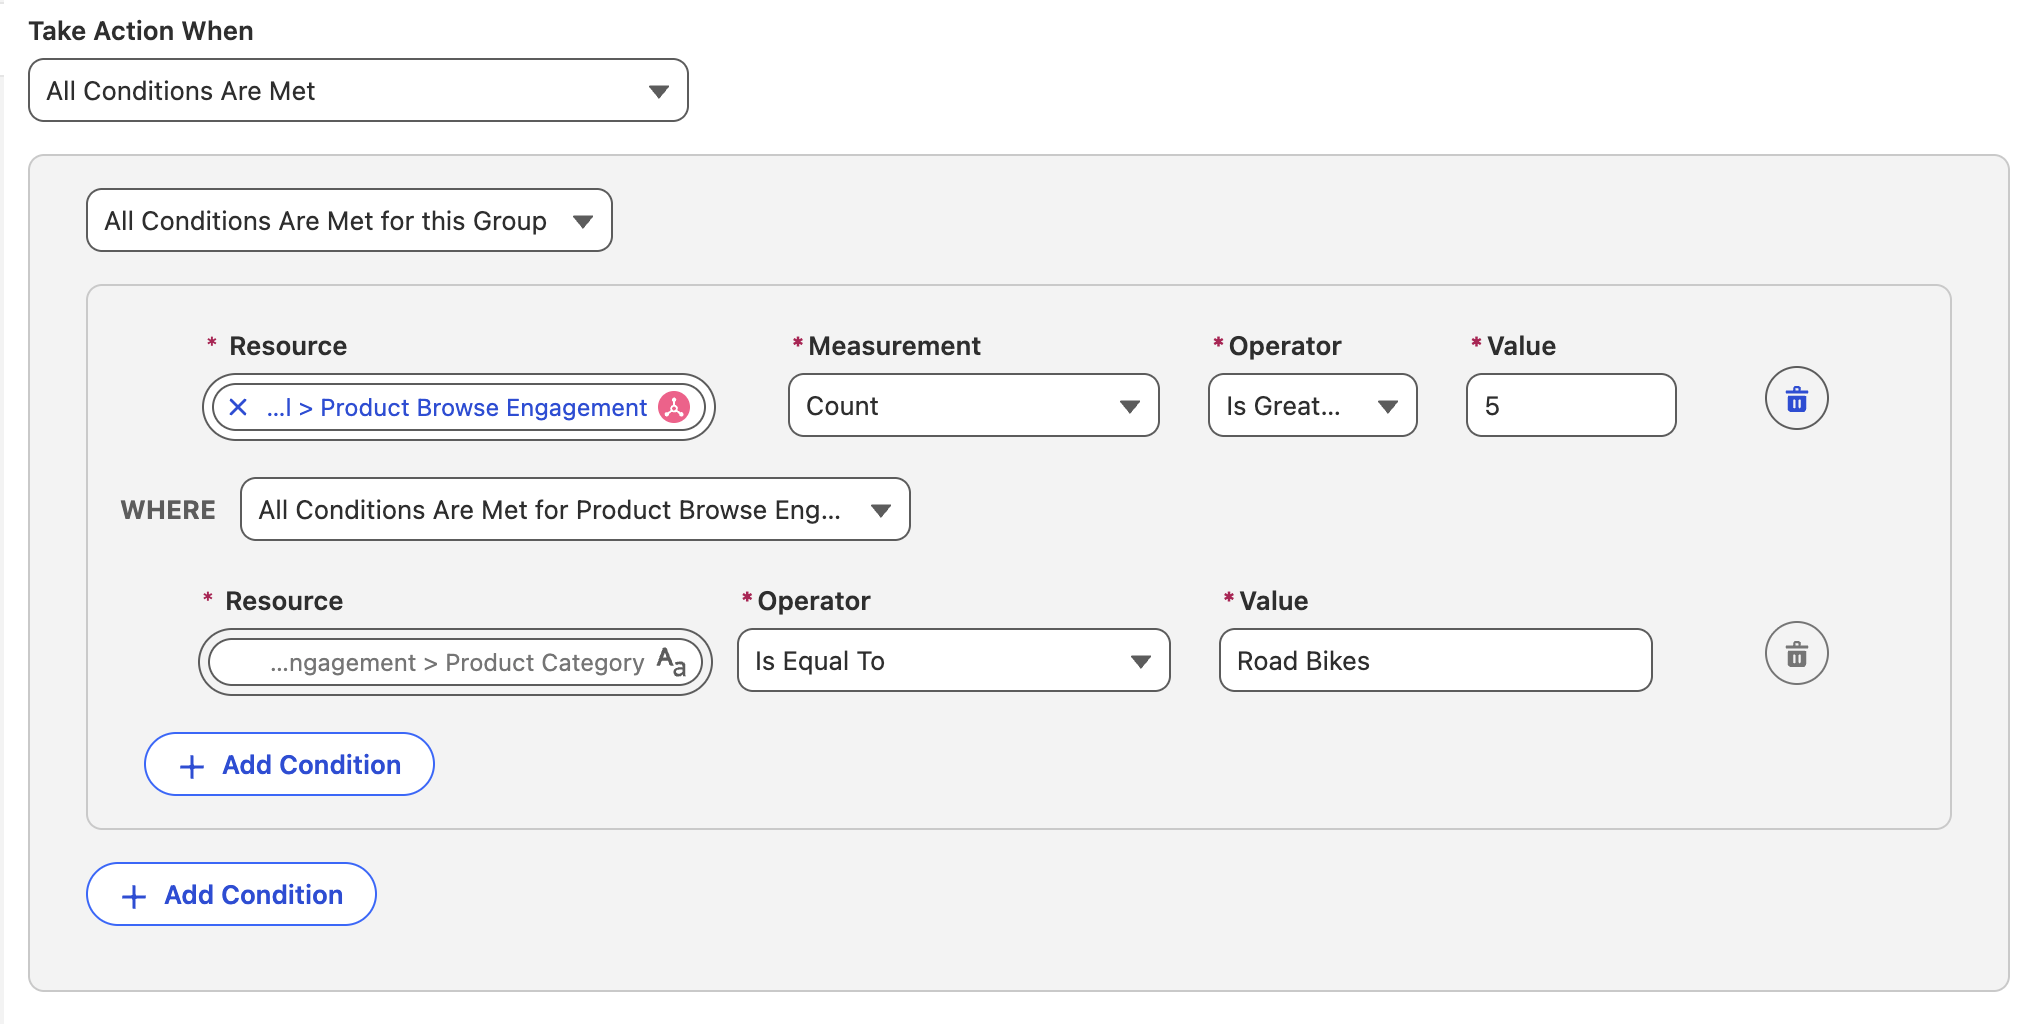
- From the Take Action When menu, select All Conditions Are Met.
- Click
Add Group. - Select the following values:
- Resource: Related Attributes > Unified Link Individual > Product Browse Engagement > Product Category
- Measurement: Count
- Operator: Is Greater Than
- Value:
5 - WHERE: All Conditions Are Met for Product Browse Engagement
- Operator: Is Equal To
- Value:
Mountain Bikes
Targeting Rule
This targeting rule uses the Product Browse Engagement DMO to identify users who have viewed products in the Mountain Bikes category more than five times.
- Click Save & New.
- Enter the following Decision Properties values:
- Decision Name:
Road Bikes - Decision API Name:
Road_Bikes - Decision State: Live
- Decision Name:
- Click Next.
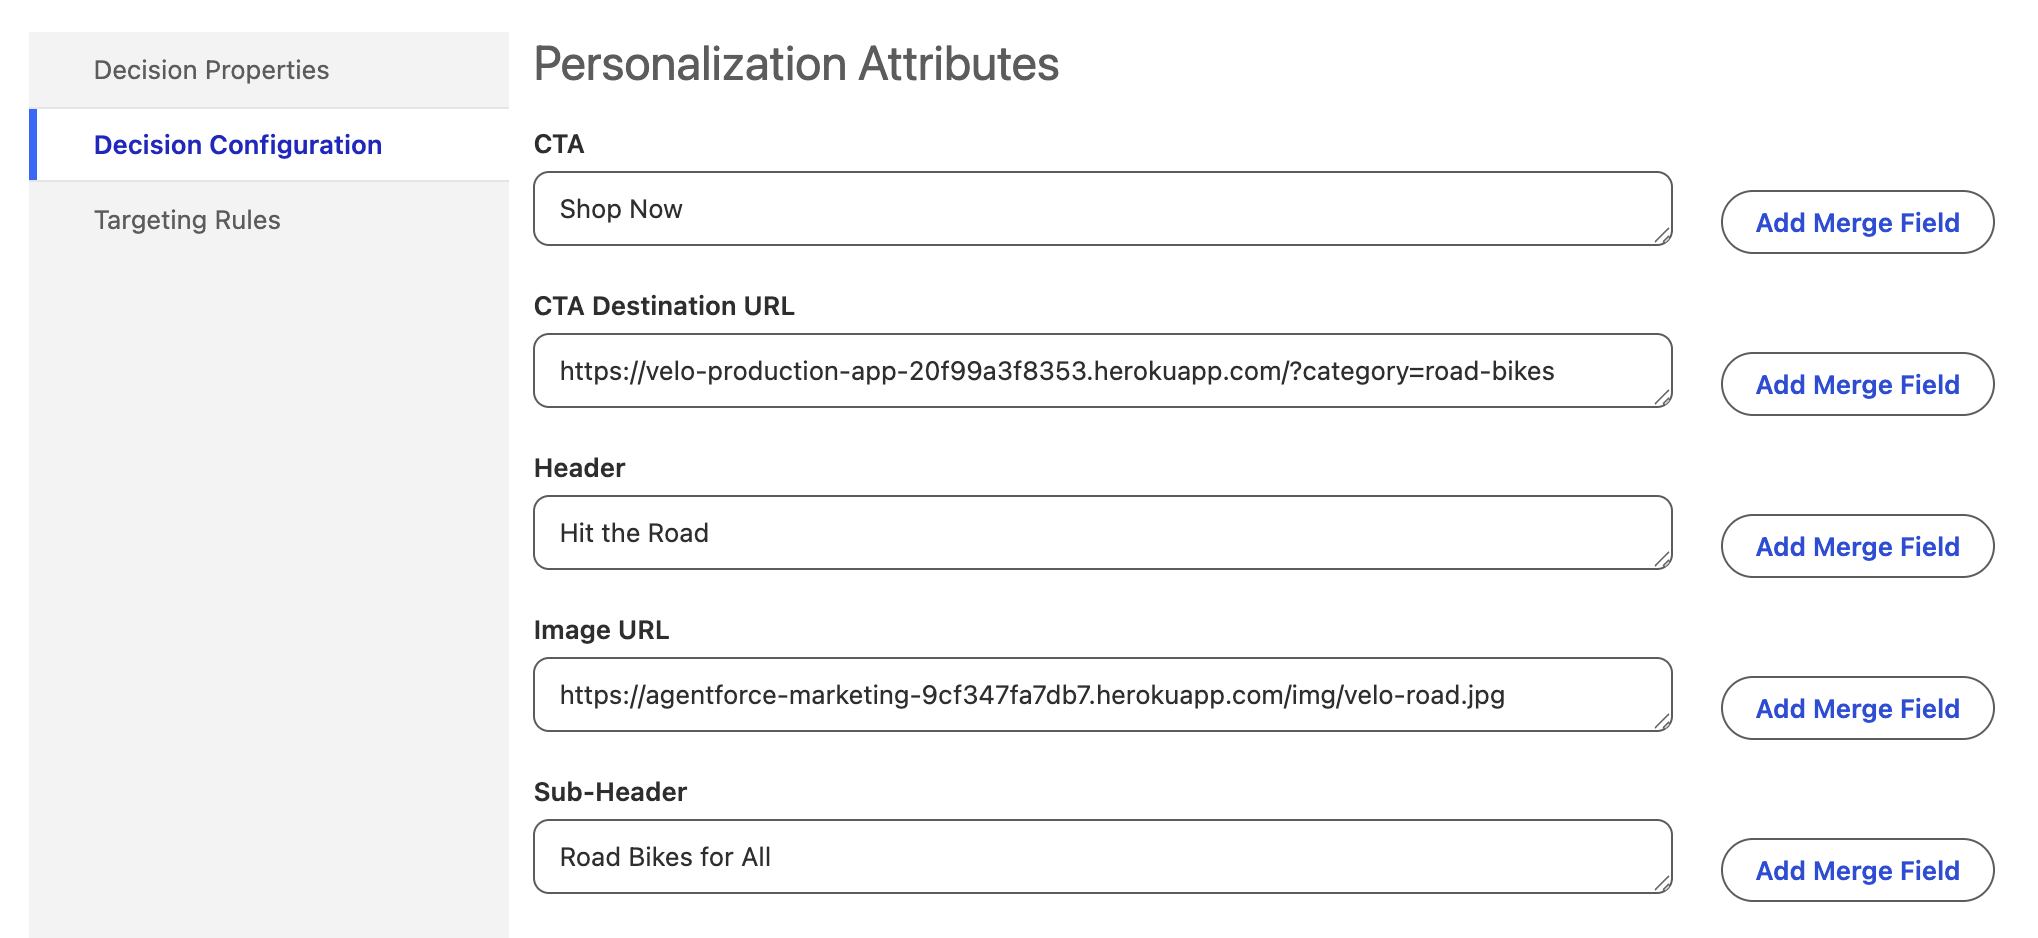
- Enter the following Decision Configuration values:
- CTA:
Shop Now - CTA Destination URL:
https://velo-production-app-20f99a3f8353.herokuapp.com/?category=road-bikes - Header:
Hit the Road - Image URL:
https://agentforce-marketing-9cf347fa7db7.herokuapp.com/img/velo-road.jpg - Sub-Header:
Road Bikes for All
- CTA:
- Click Next.
- From the Take Action When menu, select All Conditions Are Met.
- Click
Add Group. - Select the following values:
- Resource: Related Attributes > Unified Link Individual > Product Browse Engagement > Product Category
- Measurement: Count
- Operator: Is Greater Than
- Value:
5 - WHERE: All Conditions Are Met for Product Browse Engagement
- Operator: Is Equal To
- Value:
Road Bikes
- Click Save & New.
- Enter the following Decision Properties values:
- Decision Name:
Generic Hero - Decision API Name:
Generic_Hero - Decision State: Live
- Decision Name:
- Click Next.
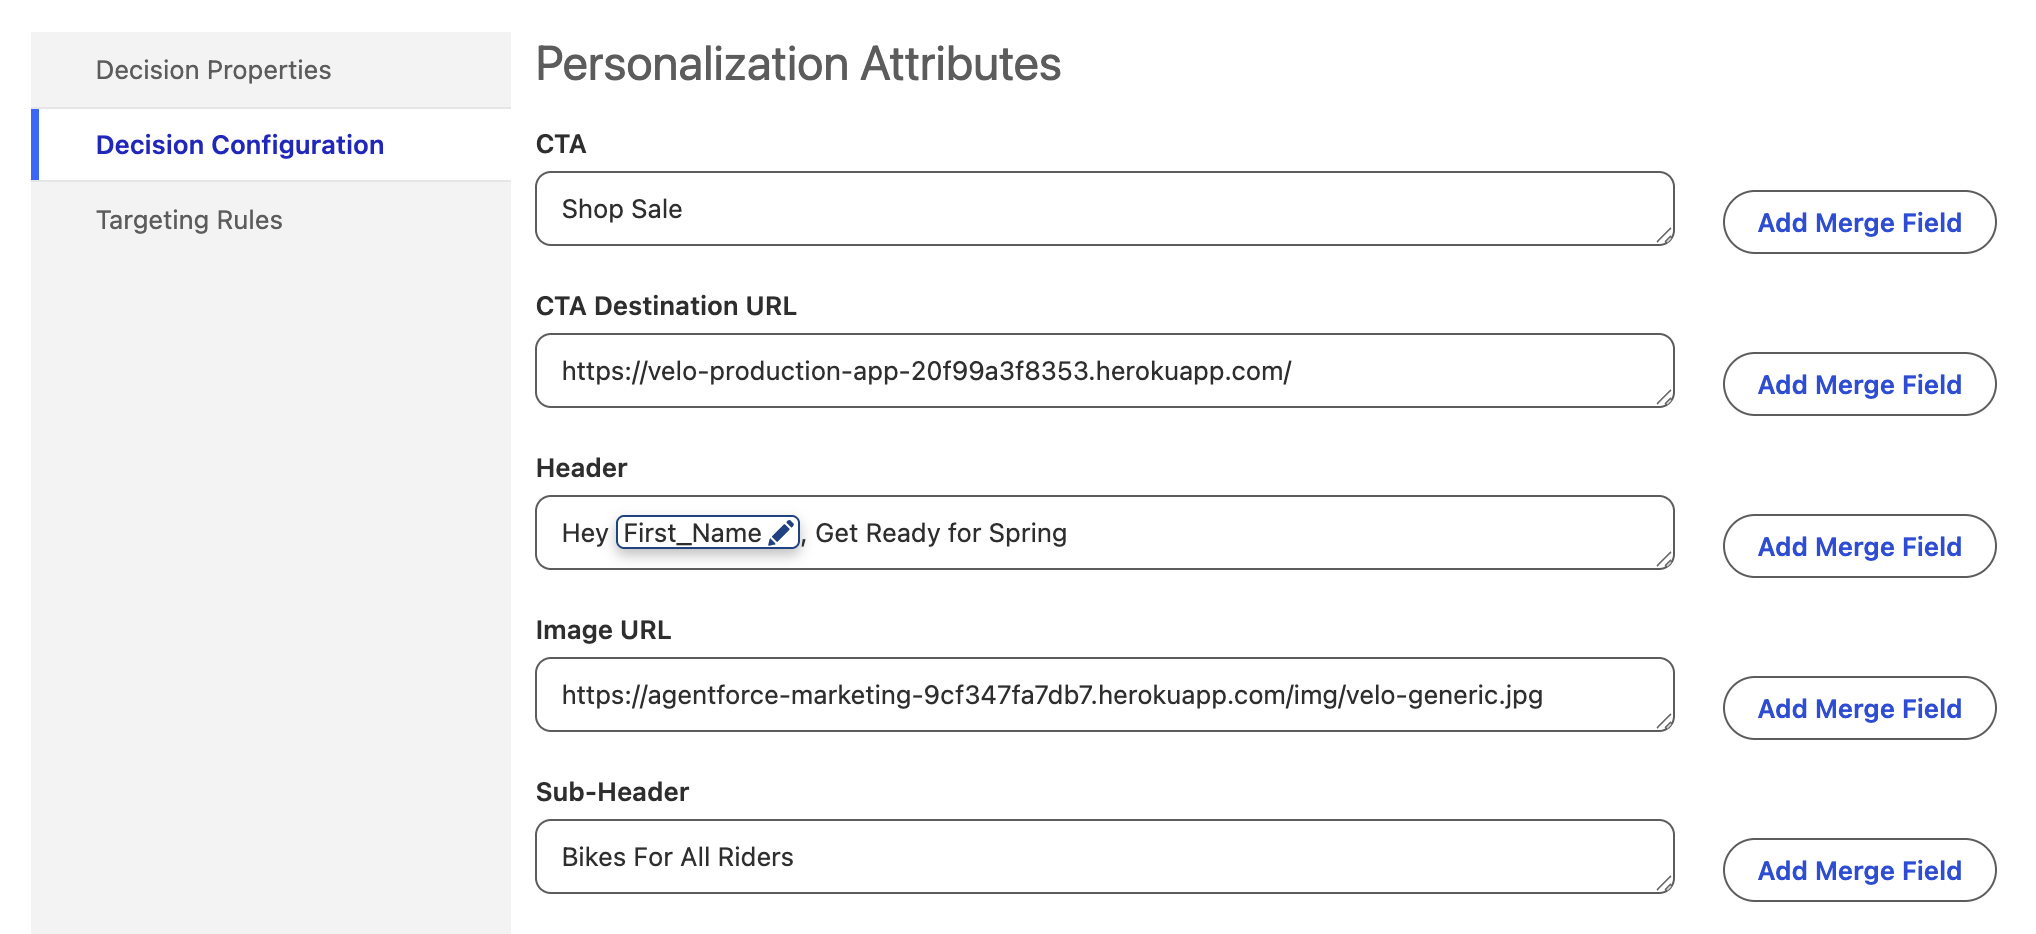
- Enter the following Decision Configuration values:
- CTA:
Shop Sale - CTA Destination URL:
https://velo-production-app-20f99a3f8353.herokuapp.com/ - Header:
Hey [first name], Get Ready for Spring - Image URL:
https://agentforce-marketing-9cf347fa7db7.herokuapp.com/img/velo-generic.jpg - Sub-Header:
Bikes For All Riders
- CTA:
- Select the placeholder string [first name] in the Header field.

- Click Add Merge Field next to the Header field.
- Select the following values:
- Attribute: Direct Attributes > First Name
- Merge Field API Name:
First_Name - Default Text:
Rider
- Click Save.
- Click Next.
- Leave the Take Action When menu, set to Always (No Conditions).
- Click Save.
Simulate Personalization Request
Now that you’ve created a manual content personalization point, you can simulate a personalization request against it using Postman, which you installed earlier in the Setup Personalization workshop.
Unauthenticated and Authenticated Personalization Requests
As this personalization point is used on a public-facing website, it operates in an unauthenticated context. This means decisions can be requested using the unauthenticated decisioning endpoint.
For customers who require an additional layer of security, Personalization also supports an authenticated decisioning endpoint, along with personalization point authentication settings that secure access to decision requests.
- Click the icon from the top setup menu and select Data Cloud Setup.
- Scroll to the Your Home Org Details section on the Data Cloud Setup page.
- Select and copy the Tenant Endpoint URL.

- Launch Postman on your computer and sign in to your account.
- Open the File menu, then select New.
- Select HTTP.
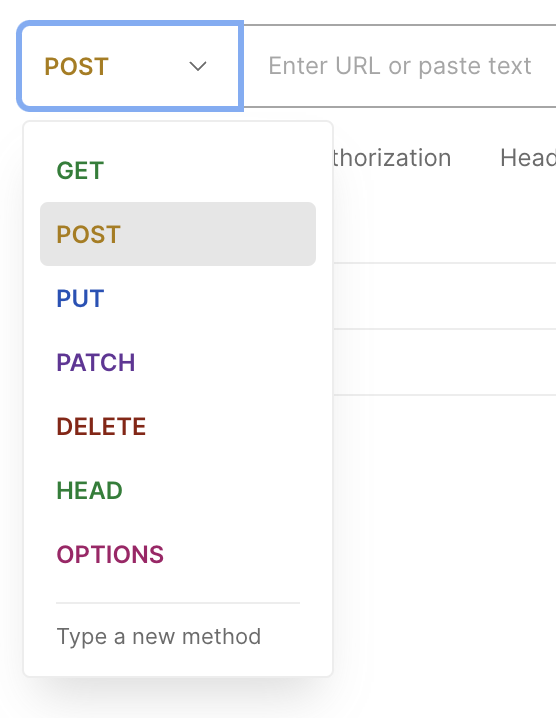
- In URL field, change the HTTP method to POST.
- In the URL field, enter
https://, then paste your Tenant Endpoint and append the path/personalization/decisionsto the end of the URL.

- Select the Body tab.
- Select the raw radio button.
- Copy the JSON code below and paste into the request body (payload) text area.
{
   "context":{
       "individualId":"d0cf39a5824a008d",
       "dataspace":"default"
   },
   "personalizationPoints":[
       {"name":"Homepage_Banner"}
   ]
}
Request Payload
In this request payload, the individualId is set to a sample value (d0cf39a5824a008d). In a real implementation, this would typically represent a device id or user identifier captured from the website. The name inside personalizationPoints corresponds to the API mame of the personalization point you created earlier (Homepage_Banner).
For additional details about request structure and available parameters, refer to the developer documentation .
- Click Send.
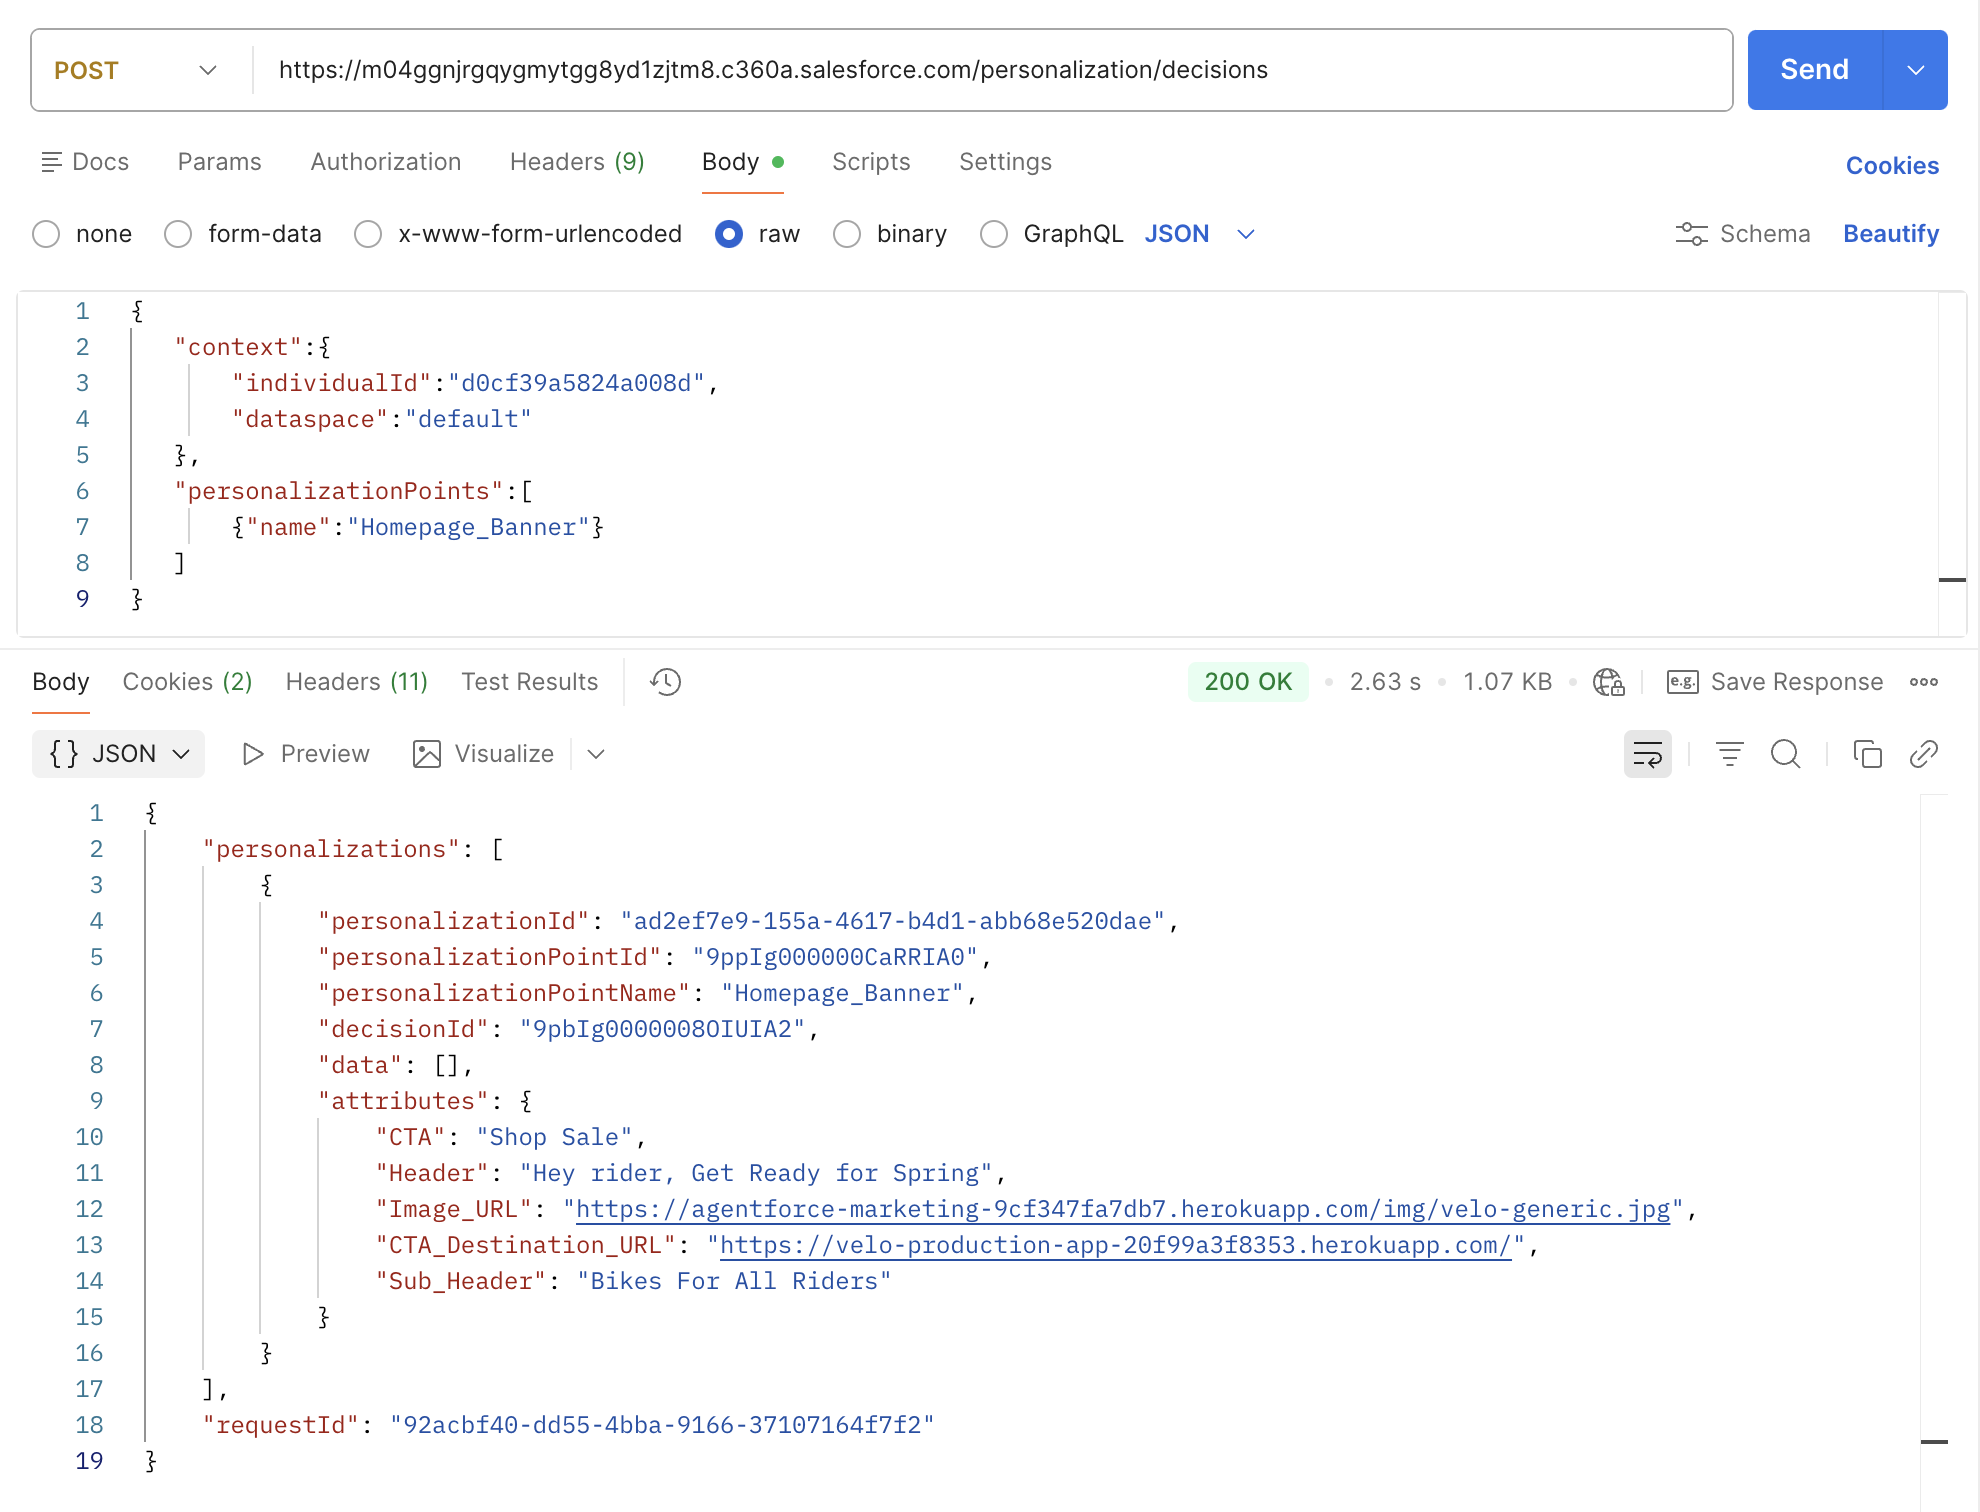
Response Payload
When this request is sent, the platform evaluates the specified personalization point and returns a decision response based on the targeting rules configured for that point. Because this request uses a sample identifier that doesn’t match any of the defined targeting criteria, the expected result is the default decision ('Generic Hero').
Build and Test a Recommendations Personalization Point
- On the Personalization Points page, click New to create a new personalization point.
- Click the Manual Setup tile, then click Next.
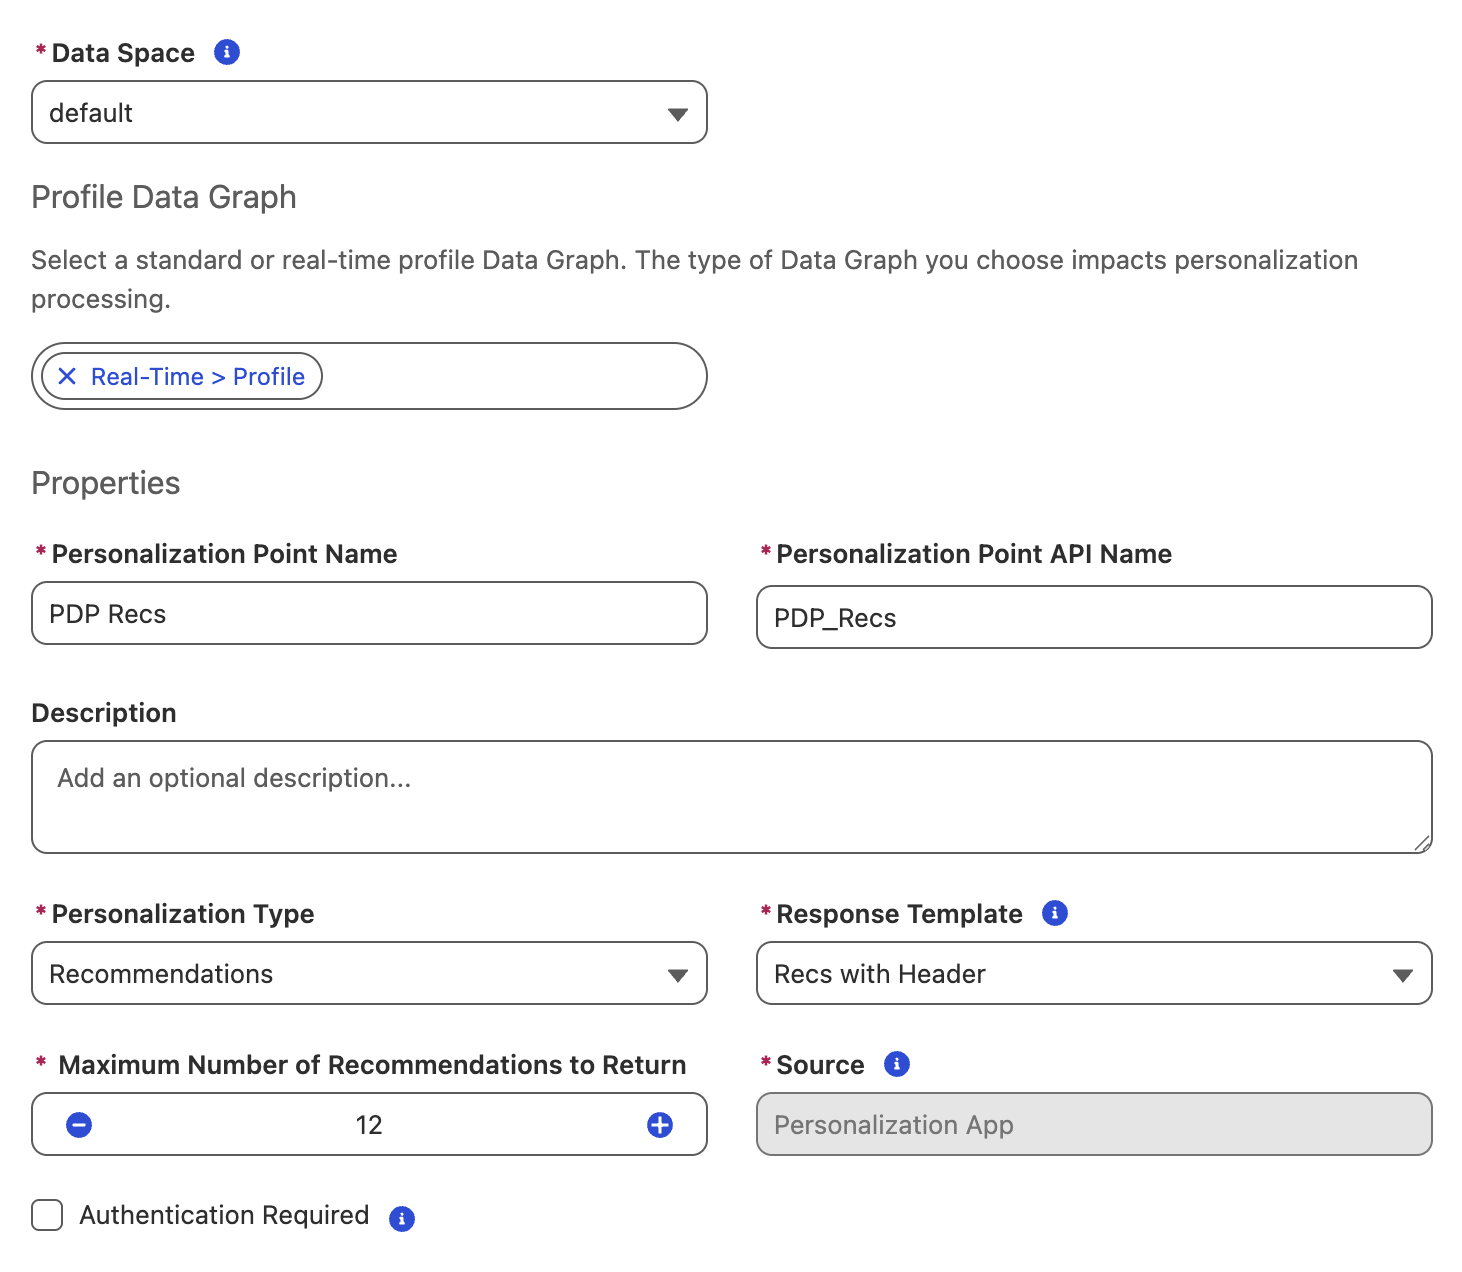
- Complete the Personalization Point Properties fields with the following values:
- Data Space: default
- Profile Data Graph: Real-Time > Profile
- Personalization Point Name:
PDP Recs - Personalization Point API Name:
PDP_Recs - Personalization Type: Recommendations
- Response Template: Recs with Header
- Click Save.
- From the list view, open the PDP Recs personalization point that you just created.
Create Personalization Experiment
In this exercise, you’ll create an experiment to compare the performance of the two recommenders you created and test them against each other.
- Click New on the Experiment section.
- Enter
Recs Testin the Experiment Name field. - Click Next.
- Select [Purchase] Revenue from the Primary Metric menu.
- In the Secondary Metrics section, select each metric and click
to add all metrics to the Selections list.
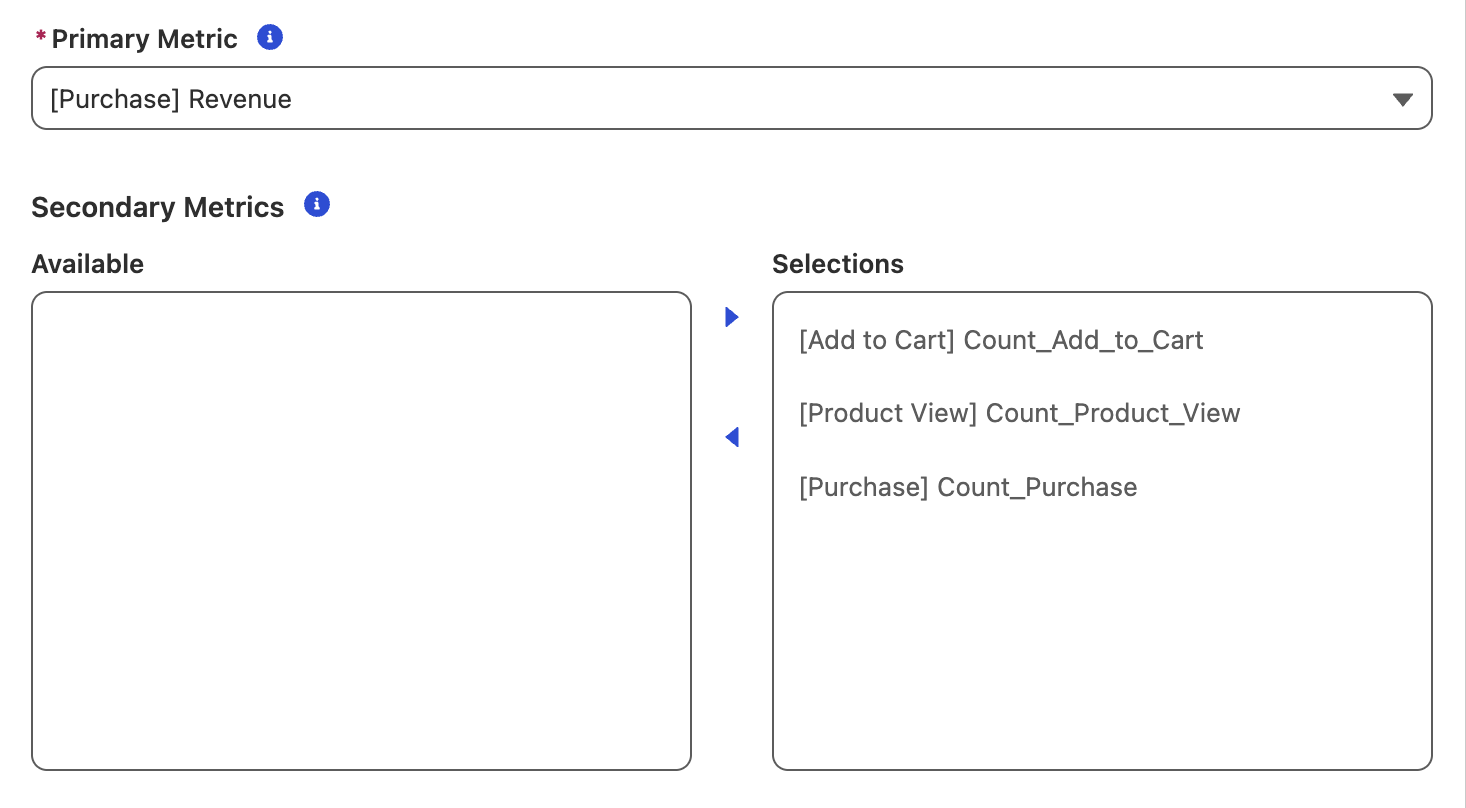
Primary and Secondary Metrics
Primary and secondary metrics are based on from the engagement signal metrics that you created. The primary metric determines which variation wins when compared across different cohorts. Secondary metrics are tracked to gain added insights into user behavior and provide a more holistic view of the experiment. They provide more information overall, and can supply possible correlations to experimental results. However, secondary metrics don’t directly decide the outcome of an experiment.
- Click Next twice, as no targeting rule is required for this experiment.
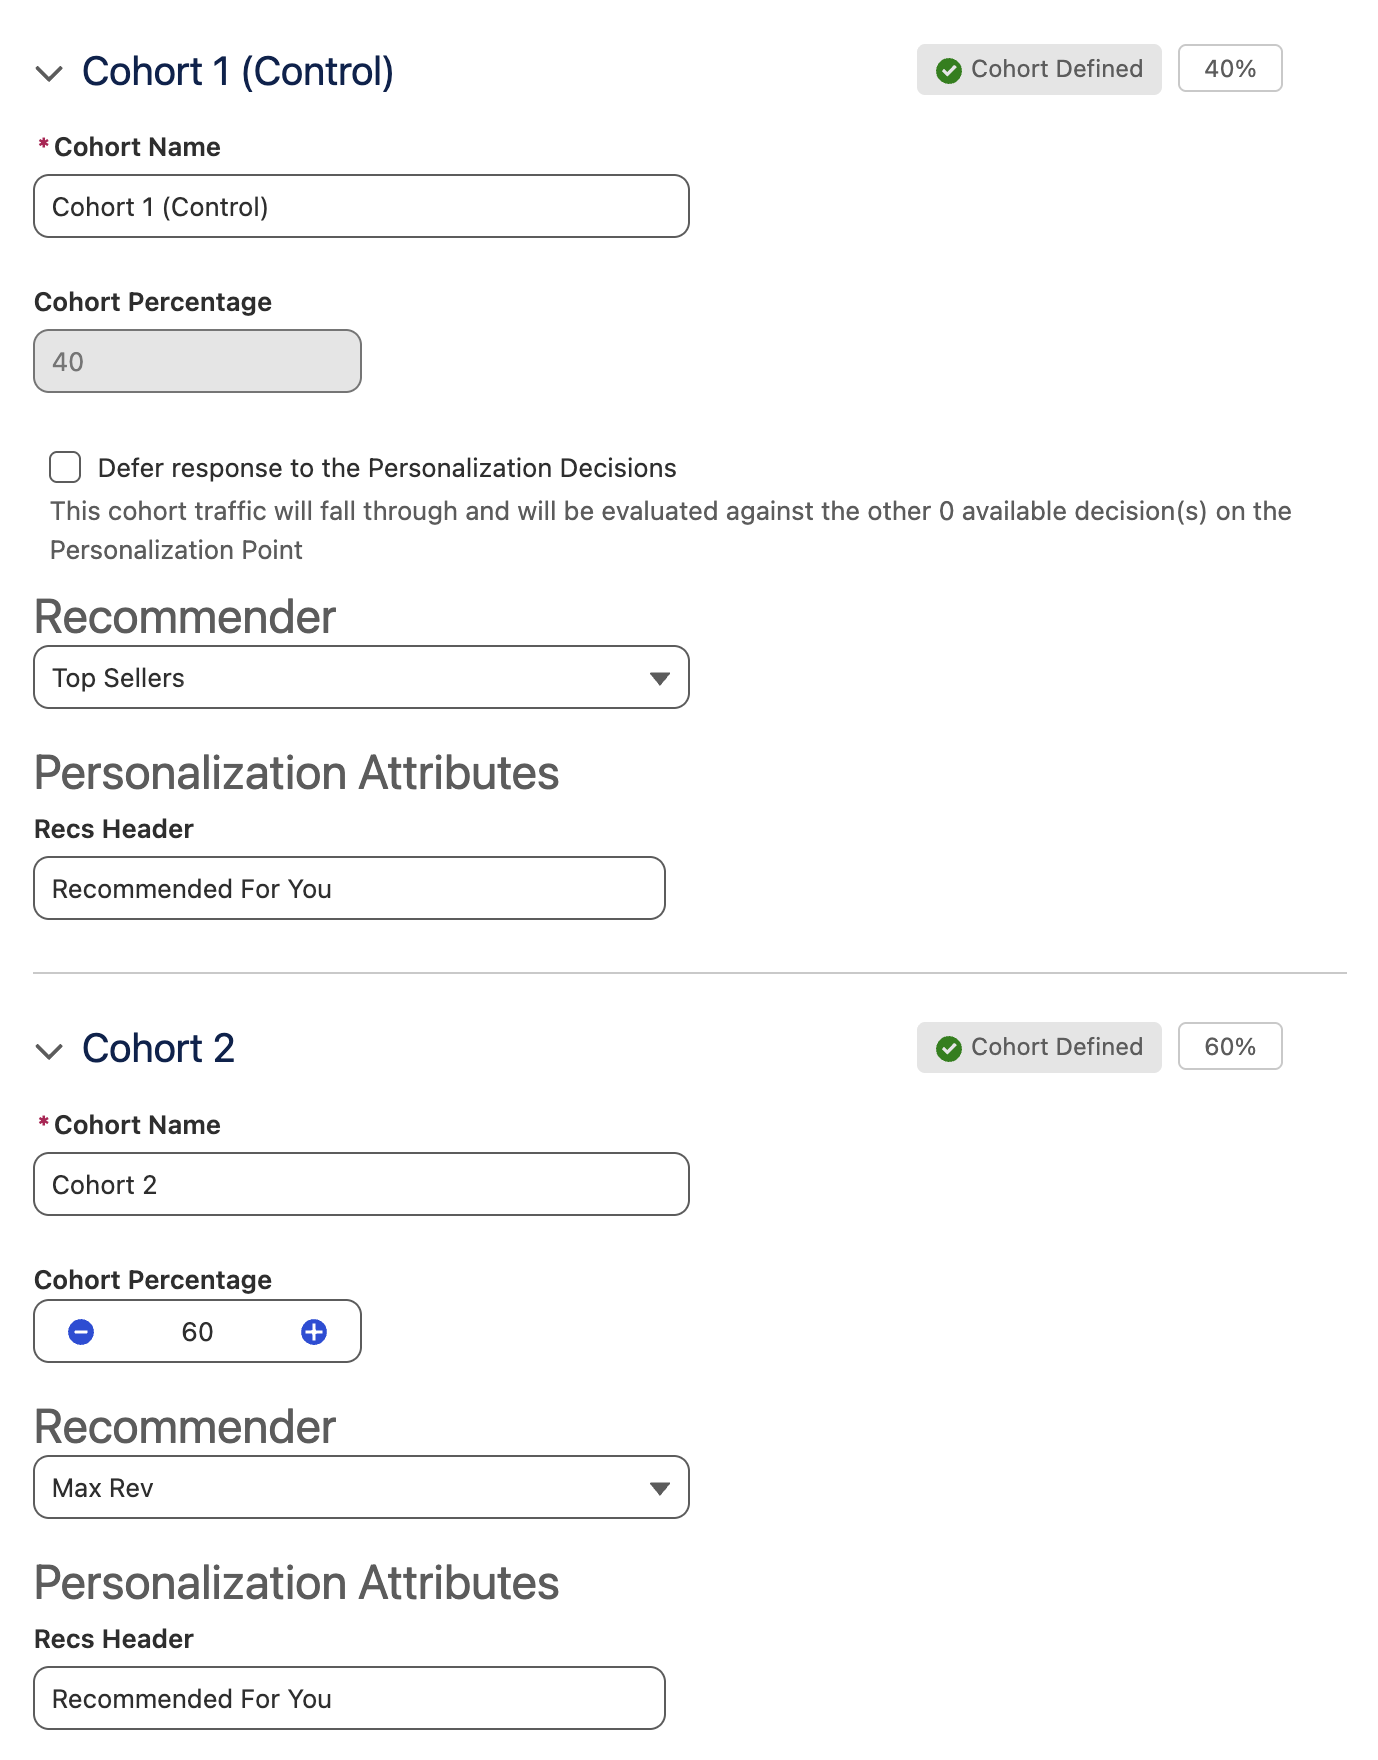
- Expand the Cohort 1 (Control) heading and select the following values:
- Recommender: Top Sellers
- Recs Header:
Recommended For You
- Expand the Cohort 2 heading and select the following values:
- Cohort Percentage: 60
- Recommender: Max Rev
- Recs Header:
Recommended For You
Cohorts
Individuals are randomly assigned to cohorts based on the defined traffic percentages at run-time. A cohort must include a minimum of 1,000 participants for winner selection, regardless of its percentage setting. You can create cohorts of different traffic sizes, each defined as a percentage of the total eligible population.
Weighted analysis is supported, and results are presented accordingly. The total percentage of all cohorts must equal 100 percent. Any unallocated percentage is automatically applied to the control cohort.
- Click Save.
- Click on the
row menu icon, then select Start to start the experiment.
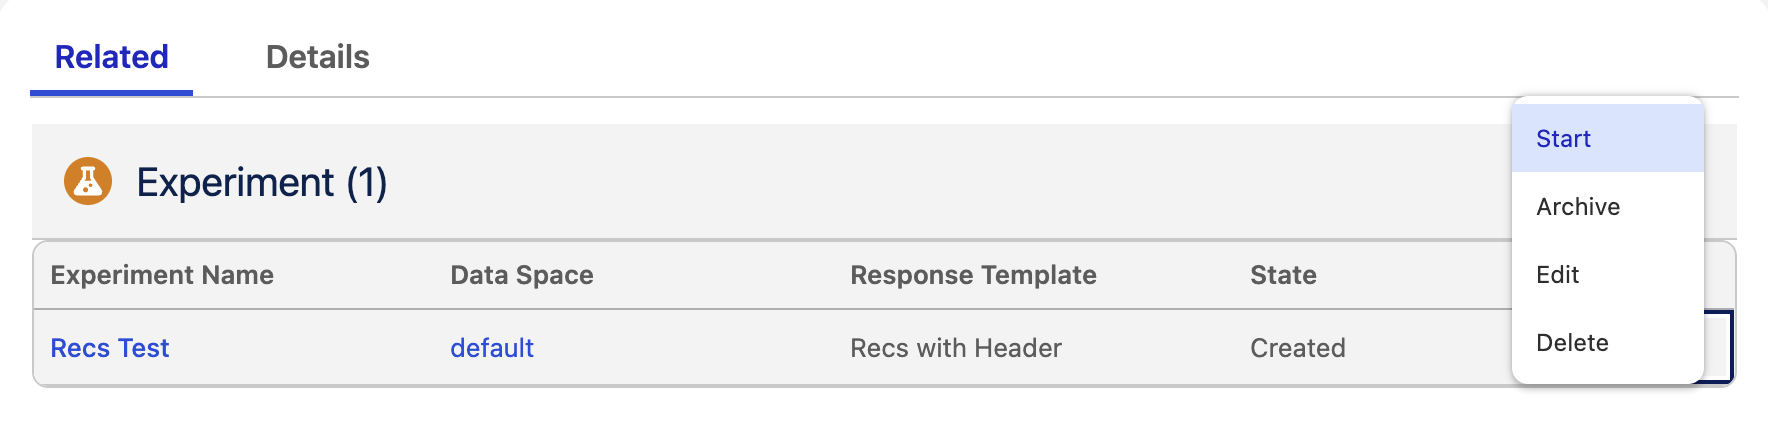
Starting Experiments
Only experiments in the Started state are evaluated at runtime.
Simulate Personalization Request
You can now simulate a personalization request against the Personalization Experiment using Postman.
- Open Postman on your computer.
- Using the same request URL that you used in the previous exercise, update the request body with the following JSON code.
{
   "context":{
       "individualId":"d0cf39a5824a008d",
       "dataspace":"default"
   },
   "personalizationPoints":[
       {"name":"PDP_Recs"}
   ]
}- Click Send.
- View the product recommendations included in the response payload returned by the personalization experiment.
View Response Payload
{
    "personalizations": [
        {
            "personalizationId": "05df0806-60af-496f-88e7-e1051d93d2c4",
            "personalizationPointId": "9ppIg000000CaRWIA0",
            "personalizationPointName": "PDP_Recs",
            "data": [
                {
                    "Product_URL__c": "https://velo-production-app-20f99a3f8353.herokuapp.com/product/4",
                    "personalizationContentId": "05df0806-60af-496f-88e7-e1051d93d2c4:0",
                    "Image_URL__c": "https://velo-production-app-20f99a3f8353.herokuapp.com/images/gravel-105-groupset.png",
                    "Price__c": "599.99",
                    "ssot__Name__c": "Gravel 105 Groupset",
                    "ssot__Id__c": "GRV-105-GRV"
                },
                {
                    "Product_URL__c": "https://velo-production-app-20f99a3f8353.herokuapp.com/product/12",
                    "personalizationContentId": "05df0806-60af-496f-88e7-e1051d93d2c4:1",
                    "Image_URL__c": "https://velo-production-app-20f99a3f8353.herokuapp.com/images/professional-cycling-jersey.png",
                    "Price__c": "89.99",
                    "ssot__Name__c": "Professional Cycling Jersey",
                    "ssot__Id__c": "JER-PRO-012"
                },
                {
                    "Product_URL__c": "https://velo-production-app-20f99a3f8353.herokuapp.com/product/8",
                    "personalizationContentId": "05df0806-60af-496f-88e7-e1051d93d2c4:2",
                    "Image_URL__c": "https://velo-production-app-20f99a3f8353.herokuapp.com/images/vintage-cycling-cap.png",
                    "Price__c": "24.99",
                    "ssot__Name__c": "Vintage Cycling Cap",
                    "ssot__Id__c": "CAP-VTG-008"
                },
                {
                    "Product_URL__c": "https://velo-production-app-20f99a3f8353.herokuapp.com/product/5",
                    "personalizationContentId": "05df0806-60af-496f-88e7-e1051d93d2c4:3",
                    "Image_URL__c": "https://velo-production-app-20f99a3f8353.herokuapp.com/images/steel-entry-road-bike.png",
                    "Price__c": "899.99",
                    "ssot__Name__c": "Steel Entry Road Bike",
                    "ssot__Id__c": "SRB-ENT-005"
                },
                {
                    "Product_URL__c": "https://velo-production-app-20f99a3f8353.herokuapp.com/product/9",
                    "personalizationContentId": "05df0806-60af-496f-88e7-e1051d93d2c4:4",
                    "Image_URL__c": "https://velo-production-app-20f99a3f8353.herokuapp.com/images/adventure-gravel-bike.png",
                    "Price__c": "2199.99",
                    "ssot__Name__c": "Adventure Gravel Bike",
                    "ssot__Id__c": "GVL-ADV-009"
                },
                {
                    "Product_URL__c": "https://velo-production-app-20f99a3f8353.herokuapp.com/product/6",
                    "personalizationContentId": "05df0806-60af-496f-88e7-e1051d93d2c4:5",
                    "Image_URL__c": "https://velo-production-app-20f99a3f8353.herokuapp.com/images/chromoly-fork-700c.png",
                    "Price__c": "189.99",
                    "ssot__Name__c": "Chromoly Fork - 700c",
                    "ssot__Id__c": "FRK-CHR-700"
                },
                {
                    "Product_URL__c": "https://velo-production-app-20f99a3f8353.herokuapp.com/product/3",
                    "personalizationContentId": "05df0806-60af-496f-88e7-e1051d93d2c4:6",
                    "Image_URL__c": "https://velo-production-app-20f99a3f8353.herokuapp.com/images/full-suspension-mountain-bike.png",
                    "Price__c": "3299.99",
                    "ssot__Name__c": "Full Suspension Mountain Bike",
                    "ssot__Id__c": "MTB-FS-003"
                },
                {
                    "Product_URL__c": "https://velo-production-app-20f99a3f8353.herokuapp.com/product/10",
                    "personalizationContentId": "05df0806-60af-496f-88e7-e1051d93d2c4:7",
                    "Image_URL__c": "https://velo-production-app-20f99a3f8353.herokuapp.com/images/insulated-water-bottle.png",
                    "Price__c": "19.99",
                    "ssot__Name__c": "Insulated Water Bottle",
                    "ssot__Id__c": "BTL-INS-010"
                },
                {
                    "Product_URL__c": "https://velo-production-app-20f99a3f8353.herokuapp.com/product/11",
                    "personalizationContentId": "05df0806-60af-496f-88e7-e1051d93d2c4:8",
                    "Image_URL__c": "https://velo-production-app-20f99a3f8353.herokuapp.com/images/gravel-feore-xt-components.png",
                    "Price__c": "449.99",
                    "ssot__Name__c": "Gravel Feore XT Components",
                    "ssot__Id__c": "GRV-XT-GRV"
                },
                {
                    "Product_URL__c": "https://velo-production-app-20f99a3f8353.herokuapp.com/product/2",
                    "personalizationContentId": "05df0806-60af-496f-88e7-e1051d93d2c4:9",
                    "Image_URL__c": "https://velo-production-app-20f99a3f8353.herokuapp.com/images/all-terrain-gravel-bike.png",
                    "Price__c": "1899.99",
                    "ssot__Name__c": "All-Terrain Gravel Bike",
                    "ssot__Id__c": "GVL-ATB-002"
                },
                {
                    "Product_URL__c": "https://velo-production-app-20f99a3f8353.herokuapp.com/product/7",
                    "personalizationContentId": "05df0806-60af-496f-88e7-e1051d93d2c4:10",
                    "Image_URL__c": "https://velo-production-app-20f99a3f8353.herokuapp.com/images/hardtail-mountain-bike.png",
                    "Price__c": "1299.99",
                    "ssot__Name__c": "Hardtail Mountain Bike",
                    "ssot__Id__c": "MTB-HT-007"
                },
                {
                    "Product_URL__c": "https://velo-production-app-20f99a3f8353.herokuapp.com/product/1",
                    "personalizationContentId": "05df0806-60af-496f-88e7-e1051d93d2c4:11",
                    "Image_URL__c": "https://velo-production-app-20f99a3f8353.herokuapp.com/images/carbon-road-bike-aero-elite.png",
                    "Price__c": "2499.99",
                    "ssot__Name__c": "Carbon Road Bike - Aero Elite",
                    "ssot__Id__c": "CRB-AERO-001"
                }
            ],
            "attributes": {
                "Recs_Header": "Recommended For You"
            }
        }
    ],
    "requestId": "e24445e7-2955-462c-becf-b1fb7f7b0441"
}
Additional Resources
- Personalization Points in Salesforce Personalization
- Add a Decision to a Personalization Point
- Experimentation
- Personalization Decision & Experiment Targeting Rules (Videos*)
- Merge Fields on Decisions: Direct Attributes (Video*)
- Merge Fields on Decisions: Segment Memberships (Video*)
- Request Personalization Method in Decisioning API
* Use the password LearnSPtoday to play videos.